-
Disease-proof your chilli farm with effective management

In this blog, you will get to know about the major chilli diseases, how to identify them on your farm and how to manage them well.
As a member of the solanaceous family, the chilli crop is susceptible to several bacterial, viral, and fungal diseases, which reduces its productivity and yield. Generally, early indications of chilli diseases include a reduction in the photosynthetic region, whereas later symptoms include infection in the plant flowers and fruits.
Effective management strategies for important diseases should be applied at various stages of disease development.
Major diseases of Chilli
There are many dangerous diseases of chilli, here are some of them –
- Damping off
- Fruit Rot and Die Back
- Fusarium wilt
- Cercospora leaf spot
- Powdery mildew
Damping off
Damping off Symptoms:
- Seedlings are killed before they emerge.
- Water soaking and stem shriveling.
- After seeds are sown in seed beds, the effects of disease signs are seen.
- It affects immature seedlings and their stems, decreasing the percentage of germinating seeds.
- Diseased seedlings have a pale brownish colour and lodging due to weakened stems. Diseases are transferred by seeds and soil.

Damping off in chilli Favourable Conditions:
Heavy rainfall, excess irrigation, poorly drained soil, and a soil temperature between 25 and 30 °C.
Damping off disease treatment
- Using 0.25 percent copper oxychloride to saturate the soil.
- Avoid shaded or darker areas while setting up a nursery and apply the recommended seed rate.
- Avoid flooding irrigation methods and keep the ideal moisture level for nursery use.
- For seed treatment, use Thiram or Captan at 4g/kg of seeds.
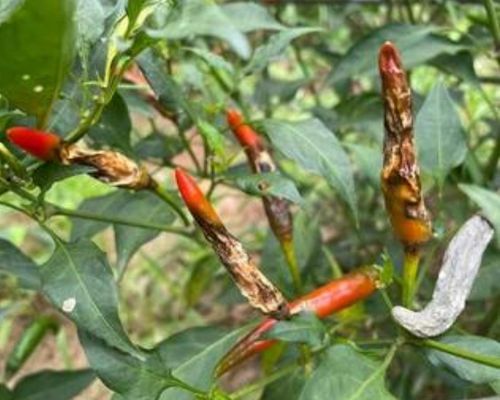
Fruit Rot and Die Back: Colletotrichum capsici
Symptoms of Fruit Rot and Die Back:
- The disease is known as “die back” because the fungus causes fragile twigs to die from the backward tips. Usually, an infection starts during the crop’s flowering stage. Flowers wilt and wither away.
- Flowers are being shed in large quantities. The flower stalk withers and shrivels.
- This withering travels from the flower stalk to the stem, which in turn causes the branches and stem to die back and wilt.
- Plants that are just partially damaged produce a few poor-quality fruits.
Fruit Rot in Chilli Management:
- The use of disease-free seeds is crucial for a healthy crop stand.
- Thiram or Captan 4g/kg seed treatment has been proven to be successful in removing the seed-borne inoculum.
- Three sprayings with Ziram O. 25 percent, Captan 0.2 percent, or miltox 0.2 percent have been said to control the disease effectively. Chemicals, including wettable sulfur (0.2%), copper oxychloride (0.25%), and zinceb (0.15%), not only decreased the incidence of disease but also boosted fruit output.
- The first spraying should be applied immediately before flowering, and the second should be applied as the fruit starts to form.
- After the second spraying, the third spraying may be applied.
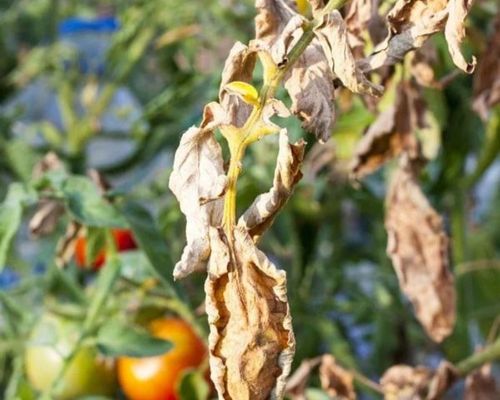
Fusarium wilt
Symptoms:
- Fusarium wilt is characterised by the plant wilting and the leaves rolling upward and inward. The dying leaves turn yellow.
- Although dispersed wilted plants may also occur, substantial percentages of wilted and dead plants typically appear in small, localised parts of the field.
- The primary disease signs are the initial withering of the upper leaves and a minor yellowing of the foliage, which develops over a few days into permanent wilt with the leaves still attached.
- By the time symptoms are visible above ground, the plant’s vascular system is discoloured, especially in the lower stem and roots.
Fusarium wilt in Chilli Management:
- Application of wilt-resistant cultivars.
- Protection may be obtained by drenching with a 1 percent Bordeaux combination, blue copper, or 0.25 percent Fytolan solution.
- It is effective to treat seeds with 2g of carbendazim or 4g of a formulation of Trichoderma viride per kg of seeds.
- Mix 2 kg of T.viride formulation with 50 kg of FYM, add water, and then wrap the mixture in a thin polythene sheet.
- Apply the mixture to rows of chillies across an area of one acre once mycelia development is seen on the heap after 15 days.
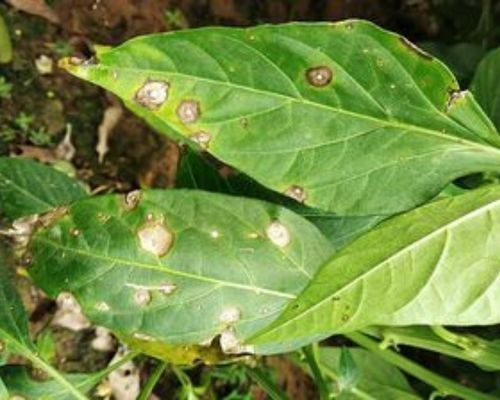
Cercospora leaf spot
Symptoms:
- Leaf lesions often have a dark brown centre with modest light grey borders. The lesions may grow to a diameter of 1 cm or more and occasionally coalesce.
- Lesions on the stem and petiole have light grey centres and black edges. However, they are often elliptical in shape.
- Significantly contaminated leaves drop off early, reducing output.
Cercospora leaf spot in Chilli Management:
Spray Mancozeb 0.25 percent or Chlorothalonil (Kavach) 0.1 percent twice at intervals of 10-15 days.
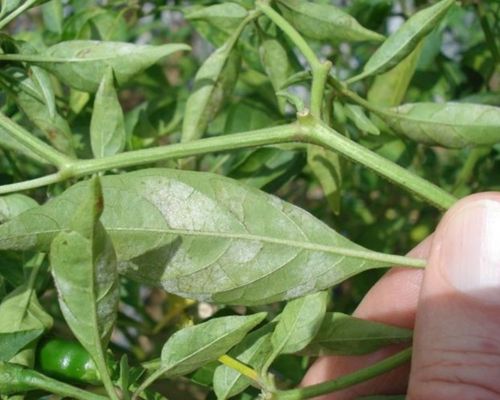
Powdery mildew
Symptoms:
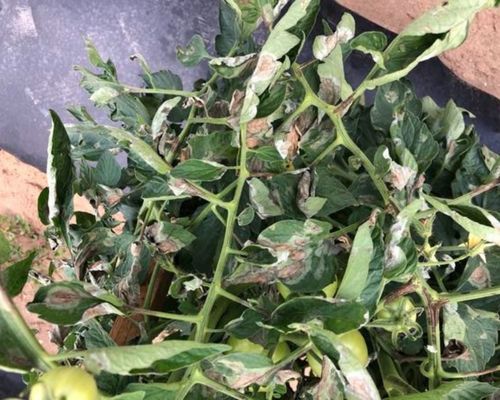
- Lesions on the upper leaf surface ranging in colour from light green to brilliant yellow are the primary symptom seen on leaves.
- The spots expand and transform into necrotic tissues. The underside of the leaves may have lesions.
- On the underside of leaves, dense whitish powdery fungal growth can develop under optimum conditions, mildly affecting the leaf shape.
- Later, the fungal growth grows to the top of the leaves; eventually, the entire leaf will wither and die, but it will still be connected to the stem.
- Fruits and stems will not exhibit the symptoms but sunscald results from a loss of foliage.
Powdery mildew in Chilli Management:
Spray Dinocap (Karathane) 0.05 percent or Wettable sulfur 0.25 percent.
How can Fasal Assist?
- Devastating chilli diseases and disorders can wholly and quickly wipe out entire chilli farms in just a few days.
- With Fasal’s technology, diseases like damping off, anthracnose, powdery mildew, fusarium wilt, and others are no longer a threat to your chilli fields.
- The technology from Fasal provides site-specific, time-specific, location-specific, and crop-specific solutions based on the concept of precision agriculture.
- In order to alert farmers when conditions are favourable for pest invasion, Fasal’s technology analyses rainfall, humidity, temperature, the projected temperature at the canopy level, and a microclimatic prediction for grape diseases.
- Based on a farm’s unique qualities, Fasal’s technology creates various management plans and proposes solutions.
Want to know more? Connect with us directly!
Co-authored: Himani Kamboj
-
Reasons for fruit drop and ways to prevent it

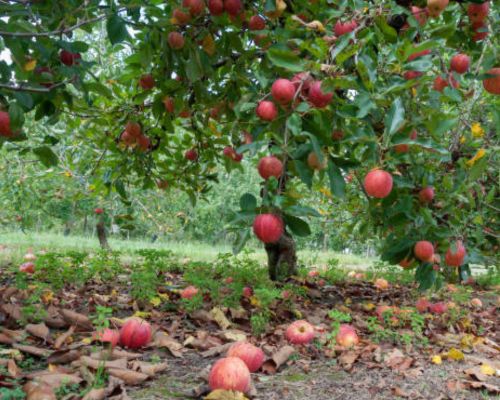
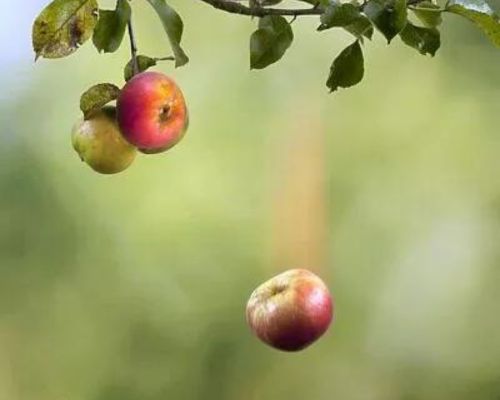
You could have observed a premature fruit drop if you are growing fruit trees in your orchard. Fruit drop can occur numerous times throughout the season, depending on the fruit.
Understandably, this might worry you. Observing your precious fruit suddenly fall to the ground before it fully grows, even if everything appears to be in order. But why is this happening? There are several causes, and in this blog, we’ll discuss all the main ones as well as suggestions for preventing fruit drop.
Fruit drop Table of contents
Major reasons for fruit drop
Various factors contribute to fruit drop in trees. The essential explanations are outlined below:
Temperature variations:
The formation and growth of buds, flowers, and fruits can all be dramatically impacted by temperature variations. Stressed plants may react by losing their buds, blooms, and fruits to survive or conserve the plant’s overall energy when temperatures fluctuate, whether they are too high during the summer or too low during the winter and frost.
Do you know? With the microclimate forecast of the Fasal system, you can prevent fruit drop in your orchard. Try it yourself. Fill out this form to take a demo.
Fruit drop Water stress:
Improper watering places a lot of strain on trees. Plants can experience this stress from both overwatering and underwatering. Underwatering may lead plants to divert water from expanding buds to food-producing sections of the plant, which causes buds, flowers, and fruits to wither and finally dry out and fall off. The plant is defending itself in this way. Excessive watering also results in root rot or other fungal infections, which may destroy the fruit.

Water stress Poor fertilisation:
Nutrient insufficiency is a prevalent issue. It may be caused by a lack of both major and minor nutrients. It differs from one plant to another. The issue can be resolved by giving your plant a balanced fertiliser that contains all these components.
Pre-harvest fruit drop is often more severe in orchards with low fertility soils, as well as orchards with low magnesium (Mg), high potassium (K), and high boron (B). It is advised that orchards receive yearly maintenance sprays of Mg (Epsom salts) at the first and third cover sprays to lessen the preharvest drop in order to mitigate the detrimental effect of high potassium on fruit drop.

Poor fertlization Extreme pruning:
Pre-harvest fruit drop is frequently significant in orchards that get heavy summer trimming. When an excessive number of leaves are removed, older, less functional plant leaves remain, which may cause a constraint in the availability of carbohydrates. Fruit drop will rise if summer pruning lowers the leaf-fruit ratio below 20:1. If summer pruning is required, it is advised to keep it moderate and remove just a small portion of the functional leaves.

Extreme pruning Insects and pest infestation:
Severe infestations of mites, leaf miners, and other insects or diseases that drastically lower the amount of photosynthate produced by plant leaves can exacerbate pre-harvest decline severity. It has been found that severe mite and leaf miner infestations lower the photosynthetic capability of plant leaves, limiting the availability of carbohydrates to the fruits in the late stages of the growing season. So, strict adherence to these levels won’t typically lead to a higher danger of the drop. However, the severity of the pre-harvest losses can be increased if significant insect or mite damage is combined with extreme pruning, low Mg, or drought stress.

Insect pest infestation Insufficient Pollination:
Young fruit that has not received enough pollination will be shed. This may be because of an absence of pollinating insects like bees and butterflies during your plants’ flowering time. You may boost their numbers by planting roses, among other garden plants that will attract bees and other beneficial insects.
Ways to prevent fruit drop
The next question is how to prevent it. The best techniques to prevent fruit drop are as follows:
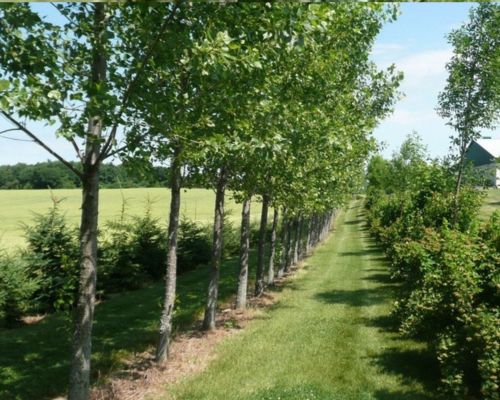
Windbreak and shelterbelt planting:
Intense wind speeds damage the fruits and branches mechanically and cause desiccation due to excessive water loss during transpiration. To protect against hot and cold winds and decrease fruit drop, windbreaks made of quickly growing, deeply rooted trees should be placed all around the orchard.
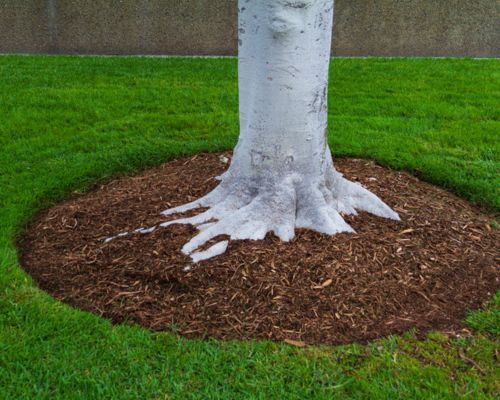
Windbreak and shelterbelt Management of Water and Moisture:
Most fruit crops experience significant fruit drops due to moisture stress during fruit set and development. In an irrigated system, water application should be based on properly timed evapotranspiration deficiencies. The scheduling of irrigation based on plant water content should be appropriate for deep-rooted perennial fruit crops.
Mulching reduces soil evaporation from the surface by reducing the supply of heat energy to the evaporating site and decreasing the soil’s thermal conductivity, which helps conserve soil moisture and increase water efficiency. As a result of this method, fruit drop is decreased. Sawdust, wheat, rice straw, and black or white polyethene are common mulching materials.
Mulching Nutritional Management:
Fertility management for reducing fruit drop should be done in a way that the intercrop residues primarily supply the fruit plants with nutritional supplements. Nonetheless, it is advantageous to apply manures and fertilisers annually close to the areas where root activity is at its highest and where rainfall incidence is most significant. Treating nutritional deficiencies involves foliar feeding of micronutrients in the required quantities.

Nutrient management Pest and Disease Management:
The perennial nature of fruit trees generates a reasonably stable agroecosystem that is conducive to the growth and spread of pests and diseases. The spread of various diseases and pests should be closely monitored, and effective management measures should be implemented to minimise any adverse effects.

Pest and disease management Growth regulator use:
Several growth regulators are suggested for preventing fruit loss in various fruit crops. When preparing the solution, however, extreme caution should be exercised. It is important to strictly adhere to the specified dose for decreasing fruit drop; for instance, 2, 4-D operates as a hormone at low concentrations but as a weedicide at high quantities.

Growth regulators How can Fasal assist?
- We now recognise that a single component does not cause fruit drop; it is affected by several parameters such as temperature changes, water stress, insect pests, etc.
- Fasal is a fully automated platform that offers a variety of services to fruit growers. It analyses temperature, humidity, expected temperature at the canopy level, and a microclimate prediction that is conducive to fruit drop with the use of sensors built into the Fasal system.
- When rain is expected, when temperatures are ideal for the formation of a disease, or when there is a possibility that a pest may appear, the Fasal system sensor will be able to tell when the soil on your orchard is excessively damp, greatly reducing the likelihood of fruit drop.
- Fasal sensors are designed to function in a way that can help create warnings for pest and disease outbreaks and only propose preventative treatments when absolutely necessary.
- With the help of Fasal technology, you can better organise your activities involved in fruit production by using weather forecasts that are tailored to your farms.
- The Fasal technology also enables farmers to acquire an accurate measurement of irrigation to be applied to fruit crops. Thus reducing the water stress in your orchard and preventing fruit drop conditions.
Co-authored: Himani Kamboj
-
How to control weeds in your fruit orchard?
As the weather changes, it is time for any unwanted plants to grow around your fruit trees. Yes, you are guessing right. We are discussing “Weeds” here. As a fruit grower, you are aware that your fruit trees require a great deal of care to ensure a good yield, yet these undesirable weeds prevent fruit development. Weeds are born with qualities that make them easy to spread.
So, If you’re sick of seeing weeds grow around your fruit trees and want to make your fruit orchard weed-free this season, you are at the right spot. This blog will cover every step you must take in order to reduce weeds in your fruit orchard.

Unwanted plants(weeds) Table of contents
- Need for weed control
- Prevention is better than cure
- Practices to manage weeds in your orchard.
- How can Fasal assist?
Need for weed control:
Let’s begin with the fundamentals. Why is it necessary to manage weeds? There are actually a number of reasons why weeds need to be removed right away. All of these factors are listed below.
- Weeds diminish the marketable fruit output by competing with fruit plants for resources such as water, food, light, and space that are intended for the fruit plants.
- Weeds make it harder to perform orchard operations, including hoeing, irrigation, and fruit harvesting.
- For instance, baru grass (Sorghum halepense), dib grass (Typha latifolia), and ar-d motha (Cyprus rotundus) are capable of limiting the growth of fruit trees in the first few years after planting. Weeds are also very competitive in nature and are better adapted to the places where they grow.
- Certain climbers also act as weeds, such as chhibber (Cucumis trigonus), spread over the top of fruit plants and block light penetration in the fruit plants. Due to the dominance of the climbers karari (Convolvulus aroensis) and chhibber (Cucumis trigonus), the majority of newly planted fruit plants die.
- Some weeds, including baru grass (Sorghum halepense) and knots of motha (Cyprus rotundus), resist eradication because of their underground rhizomes. The rate of seed generation is extremely high in weeds like Itsit (Trianthema portulacastrum) and Chulai (Amaranthus viridis). The expression “one-year sowing, seven years weeding” applies to these weeds.
- Several harmful pests and diseases use weeds as alternative hosts. The hosts insects/pests include Cynodon dactylon (Khabal grass) and Cyprus rotundus (Motha), which serve as alternative hosts for grasshoppers and aphids respectively. Mealybugs, which attack mango, guava, pear, and many other fruit trees, use Parthenium hysterophorus, also known as congress grass, as a secondary host.
Prevention is better than cure!
The ideal method is to prevent weeds and weed seeds from spreading into the orchard area. Make sure the nursery is weed-free before buying any nursery plants. When establishing an orchard, it has been noted that no weed plants accompany earth’s surface.
The orchard weeds shouldn’t be permitted to blossom. Use of farmyard waste, which may contain weed seeds, is not advised. While operating in an orchard, clean the equipment/tractor to prevent weed seeds from entering the orchard. Keep weeds out of the borders of orchards, roadways, and walks.
Some important points to consider:
- Remove the weed before it produces seeds because those are the main food sources for the following generation.
- Apply FYM that is completely decomposed and well-rotten since it can contain weed seed.
- Thorough ploughing of orchards throughout the summer season to expose weed seeds to the hot climate.
- Solarisation of the soil should be done before using it in a new orchard.
- We need to make sure that the biological mulch we apply is devoid of weed seeds.
Practices to manage weeds in your orchard
There are different practices you can follow to eradicate weeds completely from your orchard. All these practices are listed down below:
1. Controlling weeds manually
This includes hand pulling, hoeing, tillage, mowing, and smothering with non-living mulches. This weed management strategy is quite successful. The fruit tree foliage is not harmed in any way. Hand pulling entailed manually pulling out the weeds or hoeing them with a khuhpa or shovel. After hoeing, the basins can be covered with black polythene (plastic film), which will stop the weeds from sprouting and prevent further growth and reproduction. Polythene film will simultaneously help to conserve moisture and prevent moisture loss from plant basins.

Controlling weeds manually - Hand weeding – Manual weed removal is always advantageous in the early stages of a plantation or in a young orchard. Typically, weeds in plant basins and between rows are removed with a small hand tool called a khoorpi. Because the use of chemicals may harm young seedlings or plants, this method of weeding is quite effective in small orchards.
- Tillage – Tillage kills weeds by removing them from the soil. Damaging the root and stem pruning may damage plants by lowering their capacity for regeneration or competition. Weeds are also buried as a result of tillage.
- Hoeing – The hoe has been the best and most popular weeding instrument for generations. Yet, it continues to be a very helpful tool for getting results quickly and affordably. Slice the weeds’ tops off with a broad, smooth sweeping stroke.
- Digging – It is a very effective way to eliminate perennial weeds’ subsurface portions that are responsible for spreading the weeds in the deeper soil layers. Weeds are eradicated by digging up to deeper levels to remove underground roots. It is accomplished through the use of pick axes or crowbars. Remove weeds by the roots rather than just pulling out the leaves. If even tiny fragments of their roots are left, they can regrow.
- Mowing and Sickling – Sickling is also done by hand using a sickle to eliminate top growth, restrict seed formation, and starve the underground sections of weeds. Sickling is also used to control the growth of mature perennial weeds. Mowing is a machine-operated operation commonly used along yards’ sides and on fields. Sickle, scythe, and lawn mowers are the standard mowing implements. Similar to sickling, it has the same objectives. The weeds that are emerging from the ground are pulled out by dragging the sickle across the topsoil layer. For dealing with tougher weeds, the sickle is useful for dragging out the roots rather than pulling them; just anchor the blade in the base of the plant.

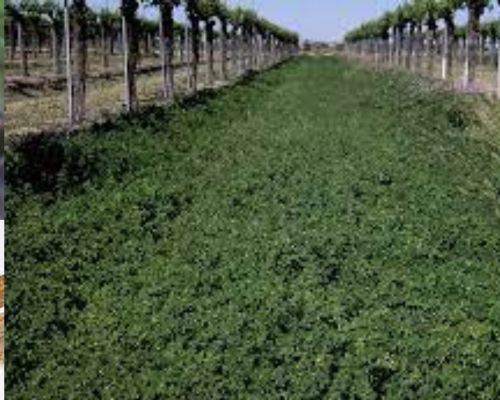
Controlling weeds manually 2. Growing cover crops
Another method of managing weeds in crops is by cultivating cover crops. Growers in our nation also favour the use of cover crops to lessen the number of weeds that are present between the rows of fruit trees. If the intercrops grown are of the ideal variety, intercropping also increases the grower’s income and enhances the health of the trees.
- Intercropping with ginger, cowpea, colocasia, and tapioca in different banana cultivars is found effective for controlling weeds.
- The most common cover crops in grape orchards are cowpea, french beans, cucurbits, sun hemp, and mung beans.
- In 3 to 4-year-old citrus orchards, it is advised to cultivate summertime crops such as tinda, bottle gourd, onion, chillies, mung, cowpea, and cotton.
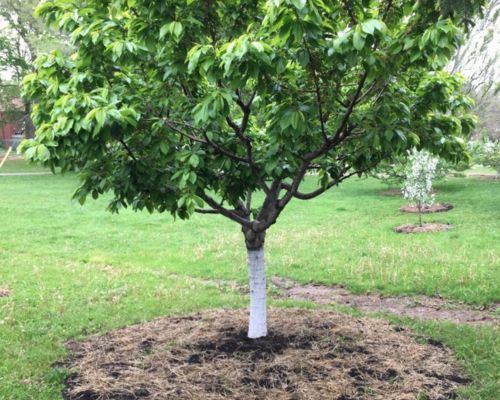
Growing cover crops 3. Mulching
Mulching proves to be another successful weed-control strategy.
For preserving soil moisture and promoting plant growth quickly, mulching using inorganic materials like black polythene film and organic materials like sarkanda, wheat and rice straw, sugar cane bagasse, dried leaves, and sawdust has been recommended.- The finest mulch for grapes in sarkanda in Punjab and black polythene in Tamil Nadu.
- Banana trees are typically mulched with both organic materials, such as dried leaves and inorganic materials, such as black polythene.
- Mulching with both organic and inorganic materials is successful in guava orchards. After one or two rains, the dried leaves are normally mulched into the soil in the basins. It is advised to plant green manure crops for the rest of the year.
Mulching 4. Use of natural enemies
The most effective weed natural enemies so far have been insects and disease-causing organisms. These insects act as natural enemies and damage weeds by feeding on seeds, flowers, leaves, stems, and roots, or by spreading viruses that infect plants. A few examples are listed below:
- The prickly pear plant is controlled by cochineal insects (Dactylopius indicus and D. tomentosus) (Opuntia sp.).
- Melanagromyza cuscutae (dodder) suppresses Cuscuta spp., and moth borer suppresses Cyperus rotundus (Bactra verutana).

Natural enemies 5. Use of herbicides :
Herbicides are frequently used to keep a weed-free zone between rows of orchard trees. For instance, both systemic and contact herbicides are useful tools for managing woody and perennial weed species that may become established when employing non-chemical approaches or for “dying back” under-tree coverings in late fall or early spring. Herbicides should be applied carefully around young trees to avoid contact with bark and leaves.
How can Fasal assist?
- Weed seeds have a range of unique methods for germination that are adaptive to variations in temperature, moisture, aeration, exposure to light, etc. When conditions are unfavourable for germination, weed seeds can either remain dormant or postpone germination.
- Fasal is an IoT-based platform for horticulture crops. It gathers real-time data on conditions from on-farm sensors in order to give farmers actionable recommendations tailored to their farms, crops, and crop stages.
- Utilising sensors and other technologies for monitoring, the Fasal System continuously monitors the microclimatic conditions on your farm, enabling you to plan irrigation and chemical treatments ahead of time and lessening the strain that unpredictable weather has on your crops. With the use of a localised weather forecast, farmers can more efficiently manage their land and manpower.
- You can regulate each stage of your crop’s growth more effectively with the aid of the Fasal System. This not only produces fruit of high quality but also decreases the chances of unwanted weeds.
- The Fasal System continuously monitors the health of the soil and crops as well as their ideal water requirements, resulting in sweeter and higher-quality fruit.
Co-authored: Himani Kamboj
-
How to attract pollinators to your fruit orchard?

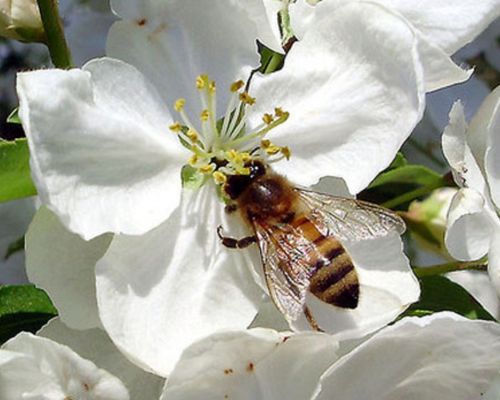
It’s almost time for flowering. Do you want your trees to bloom as soon as possible? Bringing pollinators into your orchard is the best course of action. Since pollinators are the beneficial insects that pollinate a large number of the fruits we grow, attracting them to your orchard is crucial. The orchard would appear somewhat barren without them.
Even though honey bees are the most well-known pollinators, we can also attract native bees, bumblebees, adult hoverflies, and other insect pollinators like bees.
Very likely, if you grow plants, you like seeing pollinators buzz around them. A decent crop of fruits and vegetables depends on pollination. Every grower should learn how to entice pollinators to produce a productive harvest. This article will discuss the most effective ways to attract pollinators to your orchard. You just need to take a few things into account.
Table of contents
- Importance of pollination
- Tips to attract pollinators to your orchard
- Pollinators of fruit crops
- How can Fasal assist?
Importance of pollination
- During the 20th century, insect pollination significantly increased in nations with highly automated agriculture. It is just as crucial to crop production as fertiliser or water. However, significant factors impact pollination, like better cultivars and irrigation etc.
- Insect pollination impacts both fruit quantity and quality. Proper pollination increases fruit size at harvest, accelerates maturity, and produces a more form of symmetrical fruit.
- The pollination assures the early flower set. This gives the crop the maximum time to ripen and produces a uniform and early harvest.
- Whereas improper pollination would produce fruits with smaller seeds and be malformed, decreasing the market value of the product.

Pollination Tips to attract pollinators to your orchard
The following tips will help you attract pollinators and obtain a good harvest without any disruption.
Create food supplies for pollinators:
This is the most crucial element in pollinator attraction. Native wildflowers or fruit trees are good nectar sources. It is best to have a range of plants. Plan to interplant your fruit trees with other flowering plants as soon as possible. In your area, seek native plants that are particularly easy to grow since bees are drawn to them in large numbers.
Bees are frequently drawn to blooms that are yellow, blue, purple, or white, such as asters, lilacs, clover, sunflowers, and bee balm (attraction for hummingbirds, too). Vegetable blossoms are a favourite food source for a variety of pollinators; squash and pumpkin flowers are particularly appealing. Coriander, rosemary, and other fragrant herbs are also excellent options for attracting bees in your orchard.
Pollinator Provide water source:
A few pollinators, like honey bees, depend on water to survive. To keep pollinators hydrated, keep a small dish or bird bath with an impact area. You can use a floating piece of corkboard or wood or add pebbles or stones to the container to stop honey bees from drowning. Certain bee pollinators, such as the blue orchard bee (BOB), need mud to build their nests.
Provide a location for nesting:
While honeybees don’t naturally move into your yard since they have a complicated social structure in their hive, not all bees behave in the same way. Carpenter bees like dead wood, sweat bees prefer direct sunlight, and bumblebees will build nests a few inches deep in the ground. A diversity of nesting places should be included in pollinator habitats.
Great nesting locations include groups of reeds or holes bored in wooden blocks. To prevent the spread of disease, tubes or blocks should be replaced regularly.
Consider timing while planting trees:
Timing is essential for fruit tree pollination. The same is true for mid and late-season types, and any early-season variety will pollinate another early-season variety. If you are just planting two trees, it is better to plant trees that will bloom simultaneously. In general, the bloom times of most compatible species will overlap sufficiently to allow for pollination.
Apply fertilisers at the time:
Add fertiliser gradually. After the tree has become established, use a gentle, slow-release fertiliser, such as a 10-10-10, for the first year, adhering to the relevant requirements. This encourages root development, tree health overall, and a solid bud set, which improves pollination.
Irrigate your fruit trees:
During the dry season, fruit trees should be watered once a week, especially in the first two years following planting. Drying out a tree can weaken the bud set or possibly cause the flowers to open too early. It indicates insufficient pollination and little to no fruit. Provide enough water to allow the soil to absorb it several inches deep.

Irrigate your fruit trees Keep harmful insects away:
Apply dormant oil on the trees to suffocate mites and insect eggs before they hatch and harm the buds. On one of February’s hottest and sunniest days, spray it on the trees when they are dormant. Observe all safety instructions, such as donning a respirator, gloves, and safety goggles, as well as the product’s mixing and application instructions.
Avoid spraying pesticides on bloom:
Avoid using insecticides when fruit trees are in the blooming stage to aid honeybees in pollination. Almost all insecticides are highly toxic to bees. Moreover, the bee population may suffer severe harm even if other insects are the intended target.
Steer clear of weeds:
Completely eradicate neighbouring dandelions and other broadleaf weed flowers before the trees bloom to keep bees from being diverted from pollinating the fruit trees.
Maintain Spacing:
Give your trees plenty of space between trees. For fruit trees to obtain the optimum pollination rates, spacing is a crucial factor. Different trees have different spacing requirements. Some of the fruit-bearing trees with their spacing requirements are listed below:
Fruit trees Spacing requirement Apple Semi-dwarf trees should be planted no farther than 50 feet (15 metres) from their pollinator companion. Plant the two varieties no more than 20 feet (6 metres) apart if you have a dwarf tree. Blueberry Trees of different varieties should be planted no more than six feet (2 metres) apart. Cherry Plant a distinct variety of trees no more than 20 feet (6 metres) apart. Pear Trees of different varieties should be planted no more than 100 feet (30 metres) apart. Spacing requirements of different fruit trees Pollinators of different fruit crops
There are different pollinators for different fruit trees. Some of the fruit trees with their pollinating agent are listed in the table below:
Fruits Best Pollinators Papaya Honey bees, Stingless bees, Hummingbird moths. Banana Bats, Honeybees, Wasps. Guavas Honeybees. Apple Bees. Strawberry Bombus lucorum and A.mellifera in greenhouses. Litchi European honey bees. Mango Honeybees, Allodapine bees, Sweat bees. Pomegranate Bees. Pollinators for different fruit trees 
Types of pollinators How can Fasal assist?
- Pollination can be hindered even when the trees are incompatible with other considerations. Changes in microclimatic conditions like insufficient rainfall, strong winds, or cold can harm buds before they bloom. In the fall, blossom buds develop on fruit trees. A late-spring frost or extreme winter cold can also damage buds and blooms.
- Fasal is an AI system that focuses on horticultural crops. With the help of its sensors, it analyses temperature at the canopy level and provides microclimate prediction that is good for the growth of fruit and flowers.
- With the aid of Fasal technology, you may better plan fruit production activities by using weather forecasts that are tailored to orchards.
- The early detection of disease outbreaks by the Fasal System decreases the chances of disease prevalence, thereby also decreasing the hindrance in pollination.
- The Fasal technology allows farmers to determine the precise amount of irrigation to be applied to fruits.
- The Fasal system also recommends a pesticide dose for farms, minimising their pesticide expenditures in the long run.
Co-authored: Himani Kamboj
-
How mulching can protect crops from the summer heat

This blog carries comprehensive information about the benefits of mulching during the summer season and how growers can practise it.
Summer is almost around the corner. The majority of India experiences extremely hot summers. Your plants can suffer in the heat. In the hottest weather, crops require extra care. If you are a grower, you must take extra care of your crop. During the warmest portion of the summer, mulching is the best thing you can do to help protect your plants from heat stress.
Are you wondering how mulching might help your crop? This blog will help you understand the importance of mulching and the ways to mulch your crops.

Mulching Table of contents
- Benefits of mulching during summer
- Crop showing higher yields after mulching
- How to practice mulching for your crops
- How can Fasal assist?
Benefits of mulching during summer
There are numerous benefits of applying mulch to your crops. Some of the major benefits are listed below:
1. Preservation of the soil moisture:
The rising summer heat has the potential to bake the soil. The soil will lose all of its moisture. Around a plant’s roots, the soil then gets hot and dry. Your plants will suffer as a result of this.
Mulch may both protect the soil from the sun’s rays and act as fertiliser as it decomposes. A considerable decrease in soil moisture loss can be achieved through mulching.
Whenever you apply mulch, attempt to add three to four inches. This will make it possible to maintain good moisture retention.

Benefits of mulching to the crops 2. Decreases Water run-off:
When the summer heat is most severe, your soil may become as hard as concrete. Water won’t be able to reach the plant’s roots if the soil is dried out and compacted. You might be dealing with this issue if you’ve ever seen a lot of water collecting on top of the ground’s surface and draining away.
Mulching is a solution to this issue. You may lessen the amount of water run-off from your farm during rainstorms or even when you water your crop by adding mulch. Long-term application of mulch will also assist in lowering the total quantity of water used by your plants.
Mulch can keep moisture in the soil and stop the summer heat from evaporating it. As a result, the soil itself will stay moist for a more extended amount of time. The soil will therefore be more permeable and better equipped to absorb the water the next time it rains, or you water your farm.

Benefits of mulching 3. Improves the soil temperature:
The farm’s soil temperature increases due to the sun’s constant presence. The soil temperature can still be high from the surrounding areas even if you keep a particular farm area shaded.
Mulching provides insulation. It aids in keeping your soil warmer in the winter and cooler in the summer. The cooler soil helps prevent plant roots from drying out or experiencing heat shock. Yet another advantage of properly controlled soil temperature is that it promotes greater plant growth.

Maintains the soil temperature 4. Promotes plant growth:
As previously stated, the causes of soil compaction are the summer heat and rain beating down on it.
Another disadvantage of overly compacted soil is that it inhibits plant growth. This is especially true for young plants that have not reached maturity. Plants must have the ability for their roots to spread as they expand. They can absorb more water and get firmly established in the soil when their roots are healthy.
Too much compaction prevents roots from penetrating the dense soil. A plant may suffocate as a result of being root-bound. Mulch will aid in retaining moisture in your farm’s soil, preventing it from drying up and hardening.
5. Safeguards soil microbes
The soil on your farm is home to various helpful microorganisms. Extreme heat can kill these organisms. The lack of beneficial microorganisms on your farm might encourage the growth of dangerous bacteria and fungi. Mulch will help your farm’s soil stay at a consistent temperature, shielding microorganisms from the summer heat.
The mulch will also be advantageous to other microbes, such as earthworms. The nutrients that mulch adds to the soil and the milder temperatures are what pull earthworms to it. Earthworms will start to prefer your farm if the soil is cool and stays moist. The increased quantity of earthworms and soil microbes will then benefit your plants.

Safeguards soil microorganisms Crops showing higher yields after mulching
Numerous crops produce high yields after mulching. These crops are listed in the table below.
Vegetables Fruits Potato
Capsicum
Tomato
Cauliflower
Chilli
Cabbage Brinjal
BhendiOrange
Grapes
Banana
Pomegranate
Peach
Papaya
Lemon
Apricot
GuavaList of crops showing higher yields after mulching How to practice mulching for your crops
Mulching should be done during bed preparation for vegetables, while in case of fruit orchards, it should be done just after planting of crops.
- Before installing mulch film, mark the rows on the field.
- Set up the primary bed.
- Add Farm Yard Manure, a fertiliser dose of 100 kg of DAP, and 10:26:26+ MgSO4 @ 50kg per acre. Using a rotavator, thoroughly blend the FYM into the soil.
- For two-row crops like capsicum, cauliflower, and cabbage, prepare the final beds with widths of 75 to 90 cm, and for single-row crops like tomatoes, brinjal, chillies, and cucumbers, make beds with 45 to 60 cm widths.
- Ensure the bed is level before applying the mulch and clear it of any prior plant materials, such as large stones, twigs, stems, etc., that could harm the mulch.
- Place the drip lateral(a component of the drip irrigation system) on the bed and ensure that it is in working condition. (Drip laterals are installed to conserve soil moisture).
- Apply the mulch film either manually or mechanically, laying it out evenly on the beds so that the mulch will adhere nicely to the bed.
- Cover the mulch film’s corners (up to 20 cm from either end) down the length of the bed with dirt. A hot pipe or piece of stainless steel glass can be used to make a hole in the mulch.

Ways to practice mulching for crops How can Fasal assist?
- Fasal is an IoT-based system for horticulture farmers. Each Fasal sensing hub has sensors that monitor soil properties as well as macro- and micro-climates. The sensors monitor adjustments in the crop’s growth stages and upload the information to Fasal’s cloud platform.
- Farmers can utilise this technology to get updates on the crop growth phases and direct appropriate measures.
- The Fasal technology enables farmers to monitor their farms from any location and take proactive measures to increase output.
- The Fasal System also provides early warning of pest and disease outbreaks, which lowers the possibility of outbreaks during the growth stages.
Farmer advancement is constantly facilitated by Fasal technology. With the AI-based Fasal system, farmers can relax knowing that their crops will provide higher yields this season.
Co-authored: Himani Kamboj
-
A complete guide on polyhouse farming

This blog carries detailed information about polyhouse farming. This blog will give you every detail for setting up a polyhouse.
Since the beginning of time, crop production has changed due to new agricultural techniques. One such method that utilises a controlled environment is the polyhouse. Nowadays, it is difficult to meet the needs of the expanding population in terms of food because of the quickly changing weather conditions.
Under polyhouse circumstances, one may control and maintain the ideal abiotic factors necessary for the crop’s optimum growth and development, such as temperature, humidity, light intensity, airflow, etc. As a result, the harvest will be more plentiful and of higher quality.
If you are planning to do polyhouse farming, you will find the complete guide to setting up a polyhouse in this blog. Let us start with the basics:
Table of contents
- What is a polyhouse?
- Types of Polyhouse
- Crops suitable for polyhouse
- How to set up a polyhouse?
- The cost required to set up a polyhouse
- Subsidies
- Role of technology in polyhouse
- How can Fasal assist?
What is a polyhouse?
A structure where plants are grown is called a polyhouse. Flowers, fruits, vegetables, and tobacco plants are frequently grown in poly houses. The fundamental elements that affect plant growth include sunlight, soil moisture content, temperature, etc.
Polyhouse farming is the process of growing crops in an environment where the temperature, humidity, and fertilisers are all controlled by automated equipment.
An automated design is required since these physical factors must be managed manually inside a polyhouse.
Do you know? Fasal can monitor soil, climate, humidity, and crop stage for crops grown in polyhouses. Unbelievable right! Try it yourself. Fill out this form to take a demo.
Polyhouse Types of Polyhouse
There are two types of polyhouses
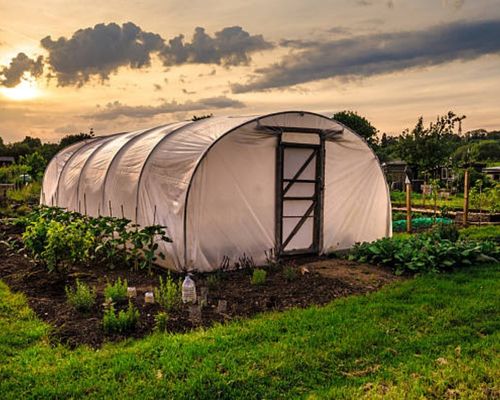
Natural Ventilation polyhouse:
This kind of polyhouse will have a fogger system and natural ventilation to ward off pests and diseases. Protecting plants from unfavourable climatic conditions is the goal of naturally ventilated polyhouses. These polyhouses are less expensive. One of the problems with these polyhouses is that they lack any environmental management system other than appropriate ventilation and a fogger system to prevent damage from weather anomalies and other natural agents.
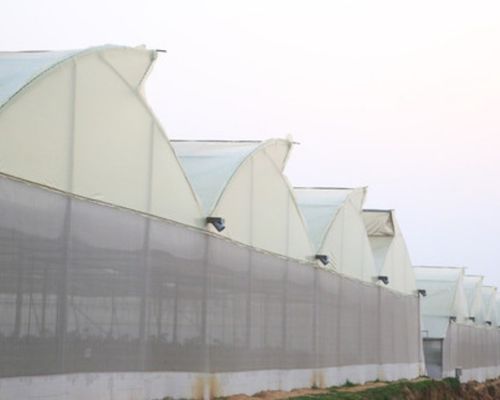
Polyhouse types Environmental controlled polyhouse:
In this kind of polyhouse system, crops are cultivated all year round by providing a regulated environment with variables like temperature, humidity, fertiliser automation, CO2, and rooting material. Many controlling systems are being put in this kind of polyhouse farming to increase productivity. These elements may increase crop yield during the off-season.
These polyhouse systems are further divided into three subcategories.
- Low-tech or inexpensive polyhouse.
- Polyhouse of medium cost or medium technology.
- A high-end or expensive polyhouse.
Environmental controlled Polyhouses Classification Costs involved Low-tech or inexpensive polyhouse. This kind is appropriate for cold weather.
Using shade netting, you can regulate the temperature and humidity.Rs.300 to 500/m2 Polyhouse of medium cost or medium technology. These polyhouses can be used in dry and mixed weather conditions.
This system uses thermostats, exhaust fans, cooling pads, and mist controllers to regulate temperature and humidity.Rs.800 to Rs.1100/m2 A high-end or expensive polyhouse. Automatic control system for temperatures, humidity, fertilisers, irrigation, and other complete environmental factors for continuously growing crops. Rs.2000 to Rs.3500/m2 Types of polyhouses Low-tech Polyhouse System:
This polyhouse system is very simple to maintain and can be created using inexpensive materials. Polyhouses are typically constructed using native materials like bamboo and wood. The most common cladding material is Ultra Violet (UV) film. This kind is appropriate for cold weather. Using shade netting, you can regulate the temperature and humidity. In this form of polyhouse, no other controlled devices will be employed.
Medium-tech polyhouse system:
In this system, galvanised iron pipes are used to construct the polyhouse. The entire polyhouse structure is secured to the ground with screws, and the canopy cover is fastened to the house’s framework with screws to prevent any damage from wind movement. This system uses thermostats, exhaust fans, cooling pads, and mist controllers to regulate temperature and humidity. These polyhouses can be used in dry and mixed weather conditions. This is pretty helpful for plants needing proper care throughout their life cycle.
System for High-Tech Polyhouses:
A system for High-Tech polyhouses includes an automatic control system for temperatures, humidity, fertilisers, irrigation, and other complete environmental factors for continuously growing crops.

High-tech polyhouse Crops suitable for polyhouse
Green beans, Bell Peppers (Capsicum), Cabbage, Spinach, Chipotle, Carrots, Tomatoes, Cucumbers, Coriander (Cilantro), Eggplants (Brinjal), Okra (Lady Finger), Summer squash, leafy greens, broccoli, microgreens, lettuce, herbs, ginger, and turmeric.
Watermelons, peaches, strawberries, raspberries, and citrus fruits are among the fruits suitable for polyhouse farming.
How to set up a polyhouse ?
While setting up a polyhouse, there are various parameters that are taken into consideration.
- The design of the polyhouse
- Structure of the polyhouse
- Orientation of the polyhouse (height, dimension, spacing, water system, wind system, fertigation system).
- Maintenance
Components required for polyhouse:
The list of components required to set up a polyhouse is described below:
- Roof: A polyhouse transparent cover.
- Gable: Transparent polyhouse wall.
- Cladding material: A translucent material that is attached to the walls and roof of a polyhouse.(have explained in detail below).
- Rigid cladding material: A cladding material that is so rigid that any distortion of the structure may cause harm to it. Example: glass.
- Flexible cladding material: A cladding material has such flexibility that any deformation of the structure won’t cause damage to it. Example: plastic film.
- Gutter: It is located between two spans at an elevated level. It collects and drains snow and rain.
- Column: A vertical structural component supporting the polyhouse framework.
- Purlin: A part that connects the columns to the cladding supporting bars.
- Ridge: The tallest horizontal portion at the roof’s top.
- Girder: A horizontal structural element that joins columns on gutter height.
- Bracings: To protect the building from the wind.
- Arches: Materials for supporting and enclosing members.
- Foundation pipe: The link between the structure and the ground.
- Span width: The gutters’ centre-to-centre distance in multi-span polyhouses.
- Polyhouse length: The length of the polyhouse measured from the roof.
- Polyhouse width: The width of the polyhouse in the gutter’s direction.

Components of polyhouse Cladding materials
The covering materials placed on the basic structure with the assistance of fastening mechanisms (i.e., inserted aluminium or GI profiles with zig-zag springs) are known as cladding materials.
Polythene is the most cost-effective cladding material. There are now UV-stabilised clear fibreglass and polycarbonate panels for roofing that are strong, unbreakable, and lightweight. Due to their economic viability, plastics are employed in tropical and subtropical regions instead of glass or fibreglass. For the growth of plants, plastics form confined environments. Compared to polythene without UV stabilisers, LDPE (low-density polyethylene) and LLDPE (linear low-density polyethylene) will last for 3–4 years.
The image below will help you understand the components even better. Now let’s understand the design of a polyhouse.
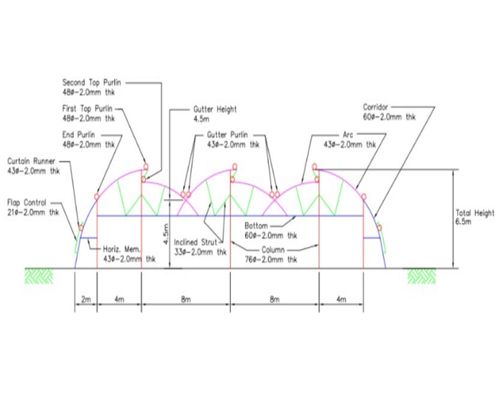
Components of polyhouse Polyhouse Design
During seasons of climatic change, producers in some locations commonly question the load that their polyhouses can withstand.
External and internal loads impact all structures, including storage buildings, greenhouses, and polyhouses. These loads are conveyed to the ground through the frame members and foundation. Typical categories for loads include dead loads, live loads, wind loads, and in some places, snow loads.
The structure must carry the following loads and be built that way.
- Dead load is the weight of all fixed construction, cladding, HVAC systems, water pipes, and other service equipment that is attached to the frame permanently.
- Live load is the term for weights that have been added by use, such as hanging baskets, shelves etc. The polyhouse must be built to support a live load of no more than 15 kilogrammes per square metre. When applied in its centre, each roof component should be able to support 45 kg of focused weight.
- Wind load: The polyhouse must be able to withstand winds of at least 110 km/h and 50 kg of wind pressure per square metre.
Structure of polyhouse
The polyhouse construction is as follows:
- Galvanised iron pipes are to be used to construct the polyhouses. The foundation can be 30 cm in diameter (or 60 cm x 60 cm x 60 cm) and one metre deep in PCC of a 1:4:8 ratio. Additionally, PCC with a 5 cm thickness should be used to cover the vertical poles up to a height of 60 cm. This prevents the poles from rusting.
- Structures in tubes are desirable. Avoid channel structures because they could distort as a result of wind pressure.
- For the polyhouse to have the greatest structural strength, a column should extend all the way to the top.
- Structures must be able to support both live and dead crop loads.
- Telescopic foundations should be used instead of conventional ones.
- Hot-dip galvanising with a minimum thickness of 2mm is preferred.
- A poly-grip mechanism secured with zig-zag springs and overflow film should be pushed well below the soil. Roll-up sides and side vents should be covered with insect-proof nets.
Orientation of polyhouse
The polyhouse’s orientation strikes a balance between the latitude of its position, the direction of the wind, and the sort of temperature regulation. In order to allow low-angle light to penetrate from the sides rather than the ends, single polyhouses with latitudes above 40°N should have ridges going east to west. The polyhouse ridge should be positioned from north to south below 40°N due to the significantly higher sun angle. Due to this direction, the gutter’s shadow can migrate across the polyhouse.
The polyhouse’s positioning and orientation should prevent the neighbouring polyhouse from casting a shadow on it. They should be positioned East to West to prevent the shade impact from one polyhouse to another. However, the latitude and wind direction should also be taken into account.
The orientation of the polyhouse is subcategorised into
- Wind system
- Dimensions of polyhouse
- Spacing between polyhouses
- Height of the polyhouse
- Water system
- System for fertigation
I. Wind system for polyhouse:
If the polyhouse is naturally ventilated, it is imperative to maximise the benefit of the wind’s natural direction. The polyhouse’s maximal dimension (length) should be perpendicular to the wind direction, particularly in the summer. The natural wind direction for a fan and pad polyhouse should match the airflow direction of the fan.

Wind system in polyhouse II. Dimensions of the polyhouse:
The size of NAV GH should not exceed 50m x 50m. The larger the polyhouse, the more heat will accumulate due to poor ventilation. The length of a polyhouse that uses evaporative cooling shouldn’t exceed 60m.
III. The spacing between polyhouses:
In order to prevent exhaust from one polyhouse from entering the adjacent polyhouse, there should be 10 to 15 m between each naturally ventilated polyhouse.
IV. Height of the Polyhouse:
The maximum height for polyhouses measuring 50m × 50m is 5m, but this height can be adjusted to fit the smaller polyhouse. The wind stress on the structure and glazing increases as the polyhouse height increases. The width of the side ventilation can be 2 m, while the width of the roof ventilation is 1 m.
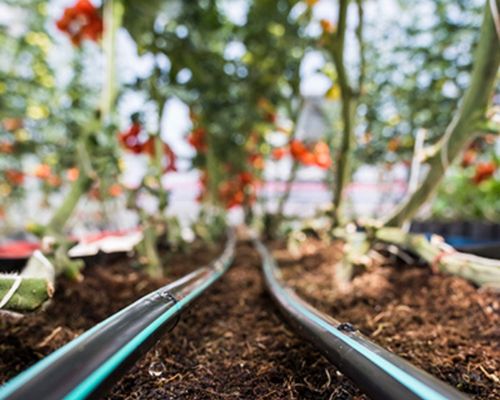
V.Watering system:
A micro irrigation system is the finest irrigation solution for plants in a polyhouse. Equipment for drip irrigation or micro sprinklers can be employed. The irrigation system should ensure that water doesn’t get on the flowers or foliage, which might cause disease and pest issues. In a micro-sprinkler system, water is forced under high pressure via nozzles positioned on a supporting stand at roughly one foot. This makes it easier to water the plants at their base.
Watering system in polyhouse VI. System for Fertigation
In a fertigation system, an automatic mixing and dispensing unit is installed, which comprises three systems pumps and a serving device. After being individually dissolved in tanks, the fertilisers are combined in a specific ratio, and drippers are used to apply the mixture to the plants.
Fertilisers
The amount of fertiliser used must depend on the growing medium. Because soilless mixes have a poorer capacity to hold nutrients, fertiliser must be applied more frequently. The pH range of 5.5 to 6.5 results in the greatest availability of essential components. On the whole, while macro components are more easily accessible at pH 6 and above, microelements are more easily accessible at lower pH ranges.

Fertigation system in polyhouse Maintenance
The upkeep of the transparent films represents the primary polyhouse expense. Since dust builds on them and reduces their ability to transmit light, the biofilm on the walls and roof needs to be cleaned periodically. Every year, the polyhouse must be solarised. Insect traps must be installed, or biological insect control must be used in polyhouse farming. It is necessary to routinely clean the irrigation system’s pipes and sprinklers to avoid the buildup of bacteria that could infect plants.
The cost required to set up a polyhouse
The type of system you select and the building site will affect the price of your polyhouse. Here are some specifics on polyhouse construction costs. These numbers could vary from time to time and from region to region. Take this as a rough estimate for building poly houses.
- The price of building a polyhouse varies depending on the type of polyhouse:
- Without cooling pads and exhaust fan systems, a low-tech polyhouse will cost between Rs. 400 and Rs. 500 per square metre.
- Medium-priced, medium-tech polyhouse with cooling pads and exhaust fan systems costs between Rs. 900 and Rs. 1200 per square metre (without automation).
- High-tech polyhouses cost between Rs. 2500 and Rs. 4000 per square metre with a fully automatic control system.
Subsidies
India’s greenhouse farming industry could come off as expensive and scary. However, state governments and horticulture departments offer subsidies to farmers to promote polyhouse farming. It would be easier to approach them if you have a thorough project report with information on production techniques, cost components, margins, etc.
Role of technology in polyhouse
The main difficulties polyhouse farms face are the significant supervision needed to regulate and maintain the environment necessary for plant growth to produce crops with the desired yield and quality. This justifies the requirement for more skilled workers to keep an eye on the environmental factors (temperature, humidity, brightness, etc.) and make quick judgements to safeguard the crops from pests or other issues.
Integration of IoT into the polyhouse is thought to be the most practical and long-lasting solution to the problems mentioned above. IoT assists farmers with decision-making, effective resource use (water, fertiliser, insecticides, etc.), and automation of the polyhouse management system.
Sensors in polyhouse systems with IoT capabilities gather data and send it automatically to a cloud server. The data is stored on cloud servers, making it possible to view it remotely and gain insightful information. IoT technologies are therefore put into place in polyhouses primarily to monitor and conduct intelligent measures as needed by the crop for its better growth and development without much human interference.

Role of technology in polyhouse How can Fasal assist in polyhouse farming
- Fasal is a comprehensive Iot based agricultural intelligence system that monitors soil, climate, humidity, and crop stage for crops grown in polyhouses while enabling you to make remarkably accurate day-to-day decisions for growing fruits and vegetables.
- With the use of sensors, the Fasal system monitors agricultural data like weather, microclimate, and soil conditions and predicts pest or disease attacks well in advance.
- Farmers that have embraced the Fasal technology have reaped the rewards, including a 20–30% increase in yield with improved quality, a reduction in water usage of up to 35%, and effective pest and disease management of up to 25% spray reduction.
- You can regulate each stage of your crop’s growth more effectively with the aid of the Fasal System. This not only produces crops of high quality but also increases productivity.
- The Fasal System continuously monitors the health of the soil and crops as well as their ideal mineral and water requirements, resulting in more sweeter and healthier fruit.
Co-authored: Himani Kamboj
-
Late and Early blight on vegetable crops

This blog contains in-depth information regarding late blight and early blight of vegetable crops and methods for identifying and preventing them.
Early blight and late blight are two diseases that attack the Solanaceae family of vegetables. These diseases are widespread. These deadly diseases, frequently found in potatoes and tomatoes, cost farmers a lot of money.
The most distinguishing differences are how they appear on your plant. Now comes the tricky part. How can they be identified and prevented? Don’t worry! You may discover all the information you need about these two diseases’ identification methods on this blog.
Table of content
- Difference between the blights
- Symptoms
- Favourable conditions
- Ways to prevent them
- How can Fasal assist?
Difference between the blights
Early blight and late blight differ on some parameters like temperature, cause of diseases, and symptoms on plants. The table below will help you spot the difference in a better manner.
Classification Early Blight Late blight Temperature The pathogen favours a temperature between 24 and 29°C, which is a little warmer. The pathogen prefers a damp, cold environment with temperatures between 12 and 18°C. Cause of disease Prolonged time of plant moisture. The spores are more likely to spread in cool, moist environments. Symptoms Older leaves develop circular dark brown rings or lesions that gradually spread to the stems and new leaves. Lesions with irregular shapes appear on the leaves, petioles, and stems. The tubers begin to rot, and the entire plant is covered in whitish cottony fungus growth. Impact The plants are less impacted than late blight. The plants are significantly harmed and impacted. Difference between early and late blight Symptoms
By looking at where they appear on the plant, late blight can be distinguished from early blight and other foliar fungal diseases. While late blight can develop lesions everywhere on the plant, they tend to be more prevalent on new growth, whereas early blight often begins on the lower leaves and slowly advances up the plant. Moreover, lesions brought on by late blight tend to be tan or light brown in colour, whereas lesions brought on by early blight tend to be dark brown with concentric rings.
Do you know? Fasal can help you recognise these symptoms on time and help you prevent these diseases on time. Try it yourself. Fill out this form to take a demo.
Late blight symptoms
- The initial signs of late blight are irregularly shaped, water-soaked lesions that frequently have a lighter halo or ring around them.
- These lesions are typically found on the younger, more moist leaves in the top part of the plant.
- On the underside of the leaf, white cottony growth may be visible during periods of high humidity. Spots can be seen on both sides of the leaves.
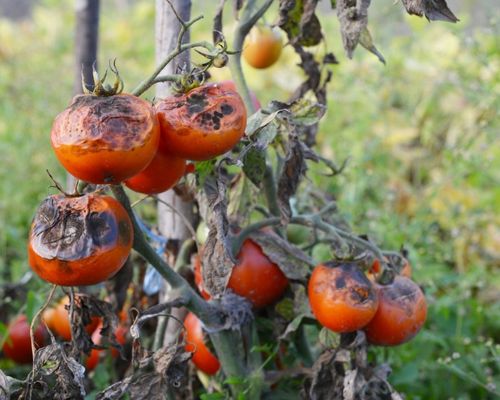
- Lesions become larger as the disease worsens, causing the leaves to turn brown, wilt, and die. Throughout all development phases, fruit can be affected by late blight.
- Rotten fruit is normally firm with oily spots that gradually turn leathery and brown in colour. These spots can grow until they completely consume the entire fruit.
late blight symptoms Early blight symptoms
Early blight signs can appear on the stem, fruit, or leaves at any growth stage.
- Lesions first appear on lower leaves as small, brownish-black spots that can grow to be between a quarter and a half of an inch in diameter and have distinctive concentric rings in the darkened area.
- When the condition worsens, the region around the lesions may become yellow and, eventually the entire leaf.
- At later stages, lesions may develop in the upper leaves, and the lower section of the plant may defoliate, making the fruit vulnerable to sunscald.
- Lesions are often deep, leathery, dark brown to black with concentric rings and can spread to cover the entire fruit.
- Spores can be found in abundance on lesions in any region of the plant.

Early blight symptoms Favourable conditions
The risk with blights is that the pathogen’s growth and dissemination can be explosive in the ideal weather conditions. The intensity of the blights is determined by favourable meteorological conditions. As a result, it is critical to recognise when to take additional precautions.
Early Blight
A suitable temperature for early blight to occur is between 24 and 29 °C, with a relative humidity between 31 and 96%.
Late Blight
- When there are water droplets, the humidity must be at its peak for spore germination.
- The ideal temperature range is 12–15 °C.
- Spores directly infect the host above 15°C, however, it takes a while. At 20–23°C, the symptoms of the spore invasion into the host body appear most visibly.
Blight impact on crops Ways to prevent the blights
Now comes the management part! There are some strategies that farmer needs to take into account to prevent the blights at the right time. The best ways to control blights are described below:
Late blight
- Space the plants far enough apart to allow for ample air circulation.
- Avoid overhead irrigation. Instead, use precision irrigation methods. Water plants in the early morning hours, so they have time to dry out during the day.
- Regularly inspect plants and eliminate weeds, sick fruit, and infected plants to prevent the disease.
- When possible, plant-resistant varieties.
- Use fungicides to safeguard the crop.
Early blight
- Use tolerant or resistant varieties.
- Start with seeds, transplants, and seed tubers that are disease-free.
- Eliminate volunteer plants, weeds (like horsenettle) and cull heaps.
- After harvesting, plough beneath crop residues to physically eliminate the disease source from the topsoil.
- Proper fertilisation will maintain a plant’s rapid growth.
- Rotate the crop every two years to avoid places where infested debris (spores of the causal agent) may be present.
- It is possible to stop the spread of disease by carefully considering irrigation scheduling (avoid late afternoon or evening) and adequate plant spacing to shorten the period that the plants are moist.
- Stake (support with stick) plants to increase airflow and lessen soil contact with the plant.
- While the plants are damp, avoid working with them.
- Spray copper-based fungicides regularly. Sprays should be well scheduled as applications made during the early season frequently fail to stop secondary disease transmission.
How can Fasal assist?
- Early and late blight diseases are affected by environmental factors, including humidity, leaf wetness, and temperature. The Fasal AI-based technology helps the farmers manage the disease’s causes and helps them increase the yield of their crops through the usage of its sensors.
- The precision agriculture-based Fasal technology proposes time, location, and crop-specific solutions tailored to the precise circumstances of a site in issue.
- Our technology lessens the risk of blight disease infection. Additionally, it tracks rainfall, humidity, temperature, projections for canopy levels, and an ultra-hyper-local macroclimatic forecast to warn farmers when conditions are favourable for the spread of disease.
- Based on the stages of disease development and the unique characteristics of a farm, Fasal technology develops several management strategies and offers remedies.
- Also, our system recommends reducing risks and calculates a farm’s susceptibility to disease development at every stage.
Co-authored: Himani Kamboj
-
5 vegetables to grow this summer
This blog carries comprehensive details about vegetables to grow in the summer season. You will get a fair idea about preparing your land for summer vegetables.
As summer time is approaching, it’s time to carefully select your vegetables so that you can make enormous profits this season. Vegetables that prefer to grow in full sunlight, love long days, and live in warm climates do well throughout the stifling Indian summer. The benefit of summer vegetables is that they can also be continued throughout the monsoon season.
If you are planning to grow vegetables this summer, you are in the right spot. This blog will walk you through planting the best summer vegetables. With a bit of planning and preparation, you can get good results.
Do you know? With the help of the Fasal system, you can get higher yields in summer. Unbelievable? Try it yourself. Fill out this form to take a demo.
Table of contents
- Cucumbers
- Tomatoes
- Chilli
- Okra
- Brinjal
- How can Fasal assist?
Cucumbers
- In India, cucumber, a climbing plant, is widely consumed as a summer vegetable.
- Cucumbers can be sown in many different soil types, from sandy loam to heavy soil. Yet, loamy soil that is rich in organic matter and has good drainage is ideal for growing cucumbers. Cucumber growing is best suited to pH levels between 6-7.
- It takes a well-prepared and weed-free field to grow cucumbers. 3–4 ploughings must be completed before planting in order to achieve fine tilth. Then, nursery beds with a width of 2.5 metres and a distance of 60 centimetres apart are created.
- It is sown between February and March. In nursery beds, sow two seeds at a 2-3 cm depth. About 45–50 days after seeding, plants begin to mature. Cucumbers are often harvested when their soft seeds and fruits are still young and green.

Cucumbers Tomatoes
In India, tomatoes are a significant commercial vegetable crop. It is widely adaptable to hot climates.
- It can be cultivated in various soil types, including clay, black soil, sandy loam and red soil, with good drainage. It performs best when planted in sandy soil that drains well and has a high organic content. The pH of the soil should be between 7 and 8.5 for healthy growth.
- It was necessary to have well-tilled, levelled soil for tomato plantation. The land is ploughed four to five times to achieve fine tilth, after which planking is used to level the soil. On a raised bed, tomato transplantation is carried out. 80–90 cm wide elevated bed is prepared for it. Soil solarisation is used to get rid of dangerous pathogens, tomato pests, and organisms that live in the soil.
- Farmers should provide irrigation at intervals of between 10 and 15 days during the summer.
- After being transplanted, the plant starts yielding fruit after 70 days. Mature green tomatoes are harvested when one-fourth of the fruit is pink.

Tomatoes Chilli
This adaptable warm-weather vegetable is available in thousands of various types, ranging from mild to scorching hot, to satisfy every taste.
- Sandy to dense clay soils are both used to cultivate chillies. The ideal soil is a well-drained, moderately light, fertile loam with a moderate ability to retain rainwater. Fruits grown in light soils are of higher quality than those in heavy soils. The ideal soil pH for growing chilli crops is between pH 6-7.
- Ploughing should be done 2-3 times, followed by clod crushing. Create ridges and furrows with a 60 cm spacing.
- The amount and frequency of irrigation depend on the soil and weather conditions.
- Chillies can be picked or harvested from the plant green or allowed to ripen.

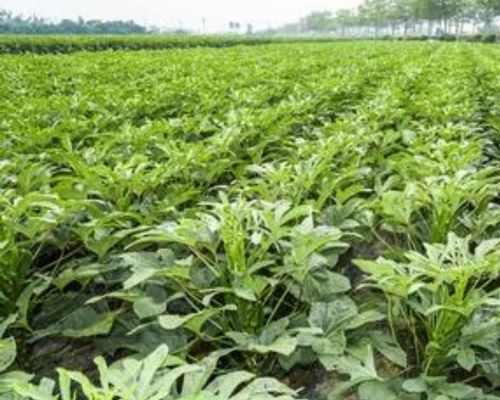
Chilli Okra
Okra is a plant that thrives in hot climates. It can be grown in a variety of soil types.
- The best soil for growing okra is sandy loam to clay loam which has plenty of organic matter and greater drainage.
- Five to six deep ploughings are used to prepare the ground, and two or three planks are used to level it.
- If there is not enough moisture in the soil, pre-sowing irrigation in summer crops is necessary to ensure successful germination. After seed germination, another irrigation is administered. After 4 to 5 days in the summer and 10 to 12 days during the rainy season, the field is then watered.
- The fruits are ready for harvest about 60 to 70 days from sowing. Harvesting should be done with small, delicate fruit. Morning and evening are the best times to harvest the fruits.
Okra Brinjal
When planted in the sweltering summer, this tasty vegetable is abundant and simple to cultivate.
- Brinjal can be cultivated on a variety of soil types because it is a resilient crop. Being a long-lasting crop, it needs fertile, well-drained sandy loam soil, which is ideal for its cultivation and produces a good yield. The pH of the soil should be 5.5 to 6.6 for healthy growth. The soil should be deeply tilled four to five times and levelled before transplanting.
- During the summer, water the field every third or fourth day and every 12 to 15 days in the winter.
- The crop is harvested when it reaches the right size, colour, and level of ripeness. For the fruit to command high pricing on the market, it should have a shiny appearance and appealing bright colour.

Brinjal You can also check for vegetables to grow in the winter season.
How can Fasal assist?
Fasal is a full-stack platform for farmers in the horticulture sector. With the help of our IoT-enabled device, we provide farmers solutions at the farm, crop, and crop-stage levels. We offer farmers the best solutions from the day of sowing through harvest. Our mission is to support horticultural growers in overcoming their difficulties.
- The Fasal system uses sensors to analyse farm elements necessary for growing vegetables, such as weather, microclimate, and soil conditions. It anticipates pest or disease attacks long in advance.
- The Fasal system alerts farmers of any chance of rain over the next 14 days and allows them to make better irrigation decisions for vegetable cultivation.
- Every Fasal system has soil moisture sensors that tell farmers when and where irrigation of the field is necessary. Based on precise measurements of the soil moisture, these sensors also assist in determining the appropriate amount of water.
- The Fasal System continuously assesses plant and soil health as well as their ideal mineral and water needs, resulting in a better and healthier crop.
- We also provide sorting, grading, packing, and logistics services to assist farmers in selling their produce at higher prices.
Co-authored: Himani Kamboj
-
How to handle agri-produce after harvest?

This blog carries comprehensive details about all the best ways to handle agricultural produce after harvesting.
A crop starts to degrade the moment it is lifted out of the ground or cut off from the parent plant. Postharvest management refers to the phase of crop cultivation that comes right after harvest. A crop’s final quality is significantly impacted by postharvest treatment when it is marketed for fresh consumption.
You might be wondering what post-harvest handling is, why it is needed and how it can be done. This blog will provide you with the best tips you need to handle crops after harvest. Let’s start with the fundamentals first.The primary objective of postharvest handling is to keep the produce cool to prevent post-harvest losses, slow down unfavourable chemical changes, and prevent physical damage like bruises to postpone rotting. Sanitation is also critical to reducing the likelihood of pathogens being carried by fresh produce, such as residue from polluted washing water.
Table of contents
Need for handling fresh produce
There are certain parameters that impact the marketing of fresh produce, such as uneven size, defects, the influence of disease and pests, and marketing standards. It is essential to consider these parameters in order to obtain better prices.
- Size– The objective is to sort different sizes of produce. It is done to classify harvests of similar sizes into one category.
- Defects-A natural need of market development is to lower surface flaws in the produce. These flaws could be physical harm that can be avoided before harvest by improving plant care practises that shield the produce from the elements like wind, sun, hail, chemical residues, etc.
- Diseases and pests- In order to control fungal, bacterial, and insect attacks and prevent the presence of unattractive marks, better control should be achieved by the appropriate and controlled application of chemicals and field cleaning techniques.
- Achieving marketing standards- A commodity’s desirable market attributes are only achievable by altering the cultivated variety. This means that producers frequently face the challenging task of adjusting to new kinds, which may have significantly different growing traits from conventional ones. Yet, if you don’t embrace change, the old categories may lose a lot of market share and cause you to lose a lot of money.
Tips for handling produce after harvest
We are now familiar with the parameters that affect fresh produce. Let’s understand how we can manage fresh produce in the best manner. The best ways to handle fresh produce are as follows:
Sorting the produce
Sorting and washing the product are the initial steps in the post-harvest handling process. This will aid in clearing the fruits or vegetables of any dirt or bacteria that could be present. Sorting makes it easier to spot any flaws so they can be fixed before packaging. Also, it aids in getting rid of any products or parts of things that can be useless or unsellable. Preparing the product for packaging and storage requires sorting, which is often done by hand and can be laborious. There are some points to be considered while sorting the produce:

Sorting the produce - Remove any contaminated goods that may clearly be seen to be covered in mud, grime, or insects.
- Products that are damaged or have defects that would prevent them from being sold should be removed. This applies to goods that have bruising, cuts, defects, etc.
- Discard any products that are not of suitable size or form for the variety. This is necessary during post-harvest handling to ensure homogeneity in the finished product.
- Eliminate any product that is beginning to senesce or display signs of deterioration and won’t last long.
- Remove any produce having an insect infestation. Also, discard any item with defects like open or broken skin.
- Items that do not comply with the grade requirements for the variety should be removed.
Cleaning
After sorting, wash the produce to get rid of any surface bacteria. Use a soft brush or a mild trickle of water to do this. Avoid using excessive force because doing so could harm the produce and leave it vulnerable to microbial infection.
Cleaning helps eliminate any dirt, dust, or germs that might have gotten on your produce while it was being handled in the field or after harvest. If there is any doubt about microbiological contamination, it is imperative to employ a sanitising agent.With the right post-harvest cleaning methods, you can guarantee that your consumers will receive appealing, hygienic items that pose no risk of infection.
Cleaning Packaging the produce
Inadequate packaging can cause fruit or vegetable damage, which reduces market access, lowers consumer demand, and lowers grower pricing. You should consider the following factors when choosing your packaging:
- The kind of crop being packaged.
- The need for packaging materials in markets (such as plastic and corrugated cardboard).
- The product’s size and weight.
- Packaging technique (case packing, single layer packing).
- Labelling specifications.
A crucial step in the post-harvest handling process is product packaging, which must safeguard the product from contamination and physical harm while minimising moisture loss. Packaging materials are carefully selected to ensure that consumers receive safe, high-quality items. The ultimate objective is to guarantee that the product’s integrity is upheld from the farm to the table.

Packaging The packaging materials must be hygienic and of food-grade quality. Plastic packaging must be smooth and free of any sharp edges that can harm the agricultural product. If you’re using corrugated cardboard, make sure the flaps are sealed with glue or tape to keep moisture out. The produce must be handled carefully as part of the post-harvest handling procedure to avoid bruising and damage.

Packaging of produce Pre-cooling
Proper pre-cooling is a crucial post-harvest method for extending a product’s shelf life. Pre-cooling aids in lowering a product’s interior temperature and extending shelf life.
It is essential to incorporate several pre-cooling techniques into your post-harvest handling procedure. The best pre-cooling techniques consist of the following:
- Forced air chilling (within the storage space): This technique uses a fan to blast cold air over the food. However, it needs post-harvest facilities to adequately maintain the temperature and humidity needed for the procedure.
- Hydro chilling – It is the technique of immersing agricultural produce for 30 to 60 minutes in a sizable tub of ice-cold water. The product is transported into bins or crates that are prepared for storage after cooling and is then placed on racks to drain.
- Icing – This is a relatively easy way to cool agricultural products. Ice and water are all you need. In just 15 minutes, icing can help fruits and vegetables’ internal temperatures drop by over 70 degrees Fahrenheit.
The sort of agricultural product you are pre-cooling will frequently affect the storage temperature, which is another important consideration. The following temperature ranges are the most crucial ones to remember for post-harvest handling:
- Lower than 41°F to prevent bacterial growth.
- Between 70 and 135°F, bacteria grow most quickly.
The respiration rate of your products and whether or not they are cold will also influence the best storage temperature for them. Use the best pre-cooling method for your product and storage circumstances to get the longest possible shelf life.
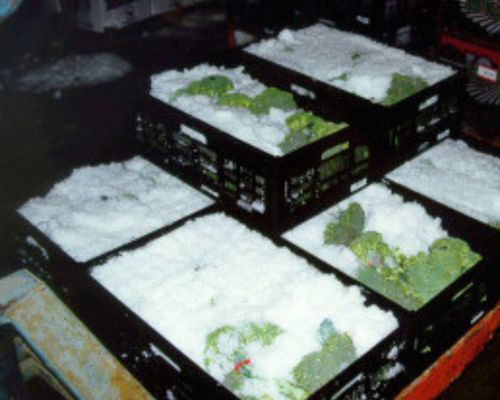
Precooling Storage
Due to microbial development or pest infestation, improper produce storage and handling can significantly reduce product quality and quantity. Ensure you have a clean storage facility with the proper temperature and humidity as you prepare for the post-harvest management of your product.
- Temperature – The majority of vegetables should be stored at a temperature of 36 to 40 degrees Fahrenheit. On the other hand, it depends on the produce.
- Humidity – For most produce, the recommended humidity range is 95-100%. Keeping some fruits and vegetables between 85 and 90% relative humidity is advisable. (E.g. melons, bananas, watermelons etc.). Maintaining the proper humidity level in your storage location is imperative to keep your produce from shrivelling or wilting.
- Storage Lifespan – Different crop cultivars have varying lengths of storage life. While storing your food as part of your post-harvest approach, many crucial variables must be considered. Some of them are listed below:
- Ensure your storage space is isolated from the processing area to prevent contamination.
- Use hygienic procedures to maintain a clean and sanitary storage environment.
- Ensure the storage racks are removed from the walls to promote optimal airflow and simple cleaning.
- Check your vegetables frequently for signs of deterioration or bugs.
- Keep track of the storage environment’s temperature and humidity.
- Make sure the produce is wrapped appropriately to prevent bruising and moisture loss.
- The product’s name, the date it was harvested, and any additional pertinent information (such as “Refrigerate After Opening”) should be written on all packaging. You can choose the optimum storage procedures for your particular produce with the aid of these data, which are essential for your post-harvest management programme.

Storage Transportation
Choosing the suitable mode of transportation is critical to guarantee that your goods arrive at their destination safely and in the finest condition possible. Consider the following factors when choosing a carrier:
- The weight of your product.
- The size of the product.
- The distance to be transported.
- The season of transport.
Temperature-sensitive products should only be transported on open trucks for a short time during the summer, especially if they will be travelling a great distance, to prevent product damage during this post-harvest handling stage. You can use your vehicle or trailer depending on how much merchandise you need to transfer locally.
Consider using a refrigerated van to transport goods that are sensitive to temperature changes in a safe and effective manner. Packing products in such a way that the temperature is constant throughout the vehicle is a solid general rule for this post-harvest handling procedure. This will lessen the chance of infection and help prevent harm.
During product distribution, take into account the following post-harvest practices:
- Ensure all surfaces that touch with food are kept clean to prevent cross-contamination. Take precautions to reduce the risk of microbiological contamination during transit.
- Make sure you have enough cold storage for your products. This post-harvest handling step will help you determine the required storage capacity. Use a temperature recorder to monitor temperatures during transport so you know exactly how cold or hot they get while being transported from one place to another.
- Using transportation equipment that has previously transported livestock, poultry, or other animals should be avoided, as it may compromise the quality and safety of your products.
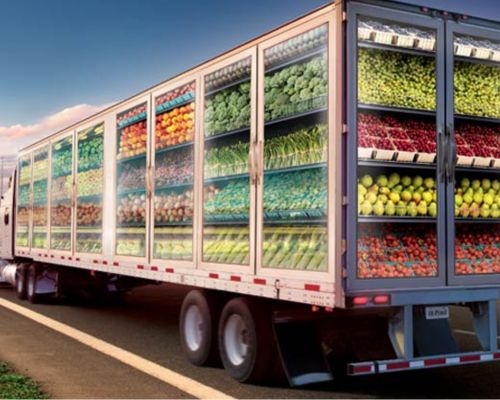
Transportation How can Fasal assist?
- Fasal is an IoT-based agricultural firm that gives farmers end-to-end traceability of agricultural produce. Precision agriculture is at the core of Fasal technology. It helps farmers make precise harvesting predictions that result in higher-quality produce.
- By selling their product and connecting them with potential customers, Fasal also assists farmers in maximising the yield of marketable produce.
- The Fasal method helps ensure product quality by allowing dealers to purchase fresh products directly from producers.
- The Fasal system allows traders to track their goods and plan ahead for their products.
- With its Sorting, Grading, Packing, and Logistics facilities, Fasal also assists farmers in getting a higher price for their harvest.
- Using the Fasal method, farmers may easily avoid produce losses and get better-quality output. We are continually working to enhance farmers’ livelihoods.
Co-authored: Himani Kamboj
-
How to identify and prevent anthracnose?

This blog carries in-depth information on the most destructive disease – Anthracnose. You will learn all the ways to identify and prevent anthracnose through this blog.
In a wide range of economically significant plants, anthracnose is the leading cause of damage. Anthracnose differs from other diseases in that it can develop even after the harvest of ripe fruits. As a result, post-harvest conditions also experience significant yield loss. Due to this loss of yield, these fruits sell for a high market price, even though sometimes this price is insufficient to cover the production cost incurred by farmers or orchard owners.
Table of contents
- Identification symptoms
- Major crops affected by anthracnose
- Mode of spread
- Management
- Conclusion
- How can Fasal assist?
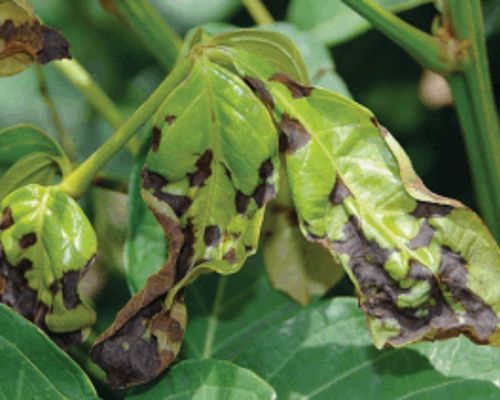
Anthracnose Identification symptoms:
The symptoms of anthracnose vary depending on the plant host and the weather.
- Anthracnose typically starts out as small, irregular yellow or brown dots on leaves. These patches become larger and darker with time, eventually covering the leaves.
- On vegetables, the disease affects any portion of the plant.
- It causes tiny, dark, sunken patches on fruits that might spread. The centres of these dots become pinkish spore masses during humid conditions. The fruits will eventually decay.
- When infected, extremely young leaves may become twisted and curled, with only a portion of each leaf dying. Trees are frequently stripped of their leaves by anthracnose diseases, leaving a rim of unharmed foliage at the top of the tree.
- It can harm the tips of young branches on trees. Young leaves are also affected, resulting in brown stains and patches. The tree may also lose its leaves as a result.

Anthracnose Are you aware? Fasal can help you detect these symptoms on time and help you prevent anthracnose on your farm. Try it yourself. Fill out this form for a demo.
Major crops affected by anthracnose
The major crops affected by anthracnose are listed below:
Beans, Banana, Pepper, Passion Fruit, Honeydew, Citrus, Guava, Cashew Avocado, Melons, Pomegranate, Tomato, Mango, Onion, Chilli and Cereals such as Rice and Wheat.Mode of spread
- It is mainly spread by water droplets.
- Warm, humid weather conditions are ideal for disease spread.
- If it is not properly disposed of before the following plantation cycle, the disease can potentially spread through the waste from prior crops.
Management
Anthracnose control strategies Classification Monitoring Monitor current conditions like irrigation and rain to see if either encourages anthracnose growth. Cultural practices Crop rotation, mulching, weeding. Chemical control Use of protective fungicides, copper sprays, and systemic fungicides. Biological control Use of bacterial, fungal, or yeast species. Anthracnose management strategies Monitoring:
In managing anthracnose, environmental conditions are also crucial. Monitor current conditions like irrigation and rain to see if either encourages anthracnose growth. Weather in the dry spring may negate the need for disease management. A wet spring or an irrigation system that wets the leaves could cause a disease epidemic, necessitating the use of control measures.
Sanitation:
Anthracnose disease can be effectively controlled by eliminating plant material and waste in which these fungi multiply. It is possible to lessen the severity of the disease by collecting and removing leaves, composting them under several inches of soil, and cutting out affected twigs.
Pruning:
Infected leaves, twigs, and branches should be pruned, destroyed, or buried in the fall or winter. For most trees, severe pruning of bigger diameter branches is not a good idea since it results in bushy water sprouts that are weakly linked to the trunk and vulnerable to diseases like powdery mildew.

Pruning Resistant varieties:
The use of resistant cultivars is advised when planting trees and shrubs that are often vulnerable to anthracnose infections.
Cultural practices:
- After the leaves have opened and the spring rains have ended, fertilise trees that are seriously afflicted to encourage rapid development. Prevent irrigation systems from wetting the foliage.
- Keep weeds out of the fields as they serve as a carrier of the disease.
- Anthracnose losses can be decreased with staking and mulching. (Staking is the practice of placing a wooden stake next to a plant to give it support as it grows.)
- Make sure to put your plants far enough apart to promote airflow and sunlight, which will help the leaf surfaces dry off more quickly once the trees are fully developed.
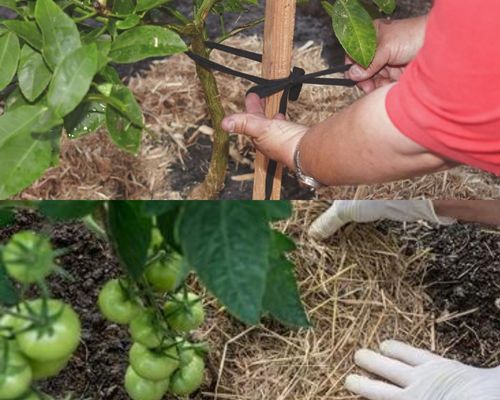
Staking and mulching Chemical control:
- Numerous fungicides offer various levels of anthracnose protection. Only healthy tissue is protected by fungicides, which leave behind persistent infections.
- Timing and full spray coverage are essential for disease prevention.
- Protective fungicides, copper sprays, and systemic fungicides are the most effective fungicides for control.
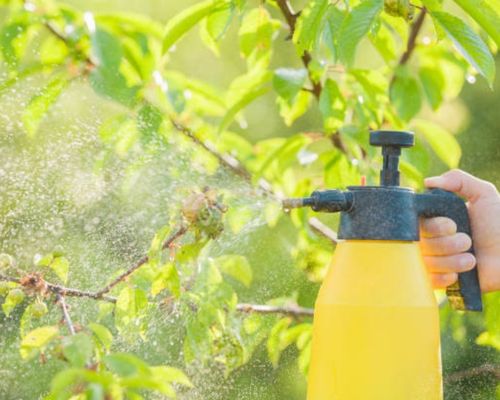
Chemical control Biological control:
Using biocontrol-based methods can be an excellent way to increase agricultural sustainability.
These methods rely on the antagonistic action of bacterial, fungal, or yeast species and can be utilised to create commercial formulations that aren’t polluting.
Studies have shown that some strains of Bacillus subtilis and Paenibacillus polymyxa and their derivatives have a significant impact on reducing the prevalence of anthracnose.
Conclusion
To protect the health of their crops, farmers must control and eradicate anthracnose from their farms. They should use extreme caution and the right timing when implementing various control systems. However, the IoT for the agriculture sector has made it possible for farmers to monitor and manage disease prevalence remotely.
How can Fasal assist?
- Fasal technology, which is based on the concept of precision farming, monitors the crop, the environment, and soil variables like soil moisture and leaf wetness to assess how well a plant is doing.
- It constantly keeps an eye on these variables, spotting any disparities and calibrating a solution in accordance with its comprehensive knowledge of the ideal circumstances for a crop. Fasal system sensors can determine whether the temperature is favourable for a disease infestation, whether the soil at a location is overly damp, and whether rain is forecast.
- Using our farm-level data, Fasal’s machine-learning technology interacts with the crop to warn farmers when their plants are at risk of disease prevalence.
- Our tailored guidance reduces the demand for fungicides while maintaining crop quality, minimising unintended environmental harm, and reducing total crop management costs.
- Additionally, farmers can monitor their crops at different stages around-the-clock using the Fasal system. We want to revolutionise the agricultural industry and offer farmers solutions to every issue they face.
Co-authored: Himani Kamboj
-
Things to know about drip irrigation system

This blog carries comprehensive information about the drip irrigation system and its benefits to agricultural crops.
The most important cultural practice in plant health management is irrigation, particularly in the context of less chemically reliant agriculture, which paves the path for sustainable agriculture. Irrigation is crucial to control the spread of pests and the severity of plant diseases. The most crucial of which is a drip irrigation system. In this blog, we will talk in detail about drip irrigation, its need and importance to agricultural crops. So let’s start with the basics:
Table of content
- What is drip irrigation?
- Need for the drip irrigation system.
- Benefits of drip irrigation system
- Crops suitable for drip irrigation
- Layout for drip irrigation system
- Sprinkler vs Drip irrigation
- How can Fasal assist?
What is drip irrigation?
Drip irrigation is a repeated application of little water at low flow rates and pressures. Rather than irrigating the entire field surface, drip irrigation delivers water precisely to the plant, where nearly all of it can be utilised for plant growth.
In drip irrigation, dripper emitters deliver small, frequent doses of water to each plant individually. It is the most cutting-edge irrigation technique with the highest application efficiency.
Water is continuously provided in drops at the same location, permeating the soil and wetting the root zone vertically by gravity and laterally by capillary action. Only a small portion of the planted area is soaked.
The lateral movement of the water below the surface is larger in medium-heavy soils with good structure than in sandy soils. Additionally, water ponds on the surface when the dripper’s discharge rate exceeds the soil’s intake rate and hydraulic conductivity. As a result, the moisture is dispersed more laterally than vertically.
Do you know? With the help of Fasal sensors, you can meet the precise moisture need of the soil. Try the Fasal system yourself! Fill out this form to take a demo.

Drip irrigation Need for the drip irrigation system.
Like humans, plants prefer to get their nutrients and water in a balanced manner. Nobody wants to consume a month’s worth of food in a single sitting, which also holds for plants. A drip irrigation system ensures ideal growing conditions that help create the maximum harvest possible by applying water and nutrients frequently and in small amounts.
A drip irrigation method makes plants more productive because
- High availability of nutrients and water.
- Water and nutrient dosages that are based on the needs of the plant’s development.
- Good soil aeration and absence of saturation.
- Prevents high salinity brought on by using too much fertiliser.
- Fungal infections cannot develop on dry foliage.
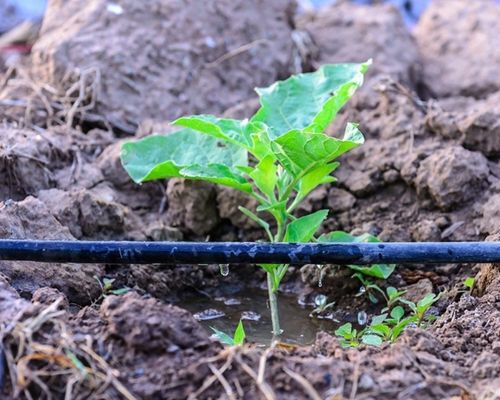
Drip irrigation Benefits of drip irrigation system
Water conservation:
This system has no wastage because water is supplied directly to the root zone. Water losses through drip irrigation are at most 2-3%, compared to sprinkler losses of 10-20% and surface irrigation losses of 35-70%.
Power conservation:
Since it runs at a considerably lower pressure, it saves power.
Preserving fertiliser usage:
When applied using a drip irrigation system, fertilisers and other chemicals can be given directly to the plant’s root zone, often resulting in a 25–30% reduction in amount and cost.
Saving Labor:
Construction of borders, bunds and other labour-intensive tasks connected with conventional irrigation systems are all eliminated by the use of technology, which can result in significant labour savings (between 60 and 90 per cent).
Decreased weed growth:
The germination of weed seeds and their subsequent growth depend on sufficient soil moisture. In drip, only the plant’s root zone obtains moisture. Hence weed growth is prevented from spreading widely.
Reduction in soil erosion:
It reduces soil erosion by feeding water and nutrients to the root zone at a lower pressure.
An increase in plant vigour and yield:
Regular water delivery to the soil without altering the soil structure has caused the young trees to grow considerably faster. This prevents damage brought on by physiological water stress, which is prevalent in traditional irrigation methods and maintains the ideal soil moisture level.
Improvement in plant produce:
The quality of plant products improves because water and nutrients are delivered slowly, consistently, and uniformly.
Pests and diseases:
By limiting soil surface moisture, humidity is minimised, which lowers the potential for the development of insect diseases and fungus issues.
Crops suitable for drip irrigation
Following are some examples of crops that can be irrigated with drip irrigation systems:
- Crops grown in orchards include grapes, bananas, pomegranates, oranges, citrus fruits, mangoes, lemons, custard apples, guavas, pineapples, cashew nuts, papayas, litchis, watermelons, and others.
- Vegetable plants – Tomato, Chilli, Capsicum, Cabbage, Cauliflower, Onion, Okra, Brinjal, Bitter Gourd, Ridge Gourd, Cucumber, Peas, Spinach, and Pumpkin, are some examples of vegetable plants ideal for the drip irrigation system.
- Flowers plants – Rose, Carnation, Gerbera, Anthurium, Orchids, Jasmine, Dahlia, Marigold, etc.- can be watered using a drip irrigation system.
- Plantation crops – Rubber, coffee, coconuts, etc., are a few plantation crops that can be irrigated with drip irrigation.
- Spices: Turmeric, cloves, mint, and other spices are appropriate for drip irrigation systems.
- Oilseeds – Sunflower, Oil palm, groundnut, and other oilseeds can be grown with drip irrigation systems.
- Forest crops – Teakwood, bamboo, and other types of forest crops are appropriate for drip irrigation systems.
Layout for drip irrigation system
The elements of a typical drip irrigation system are depicted in and include:
- Pump
- Control head
- Primary and secondary lines
- Lateral
- Emitters and drippers
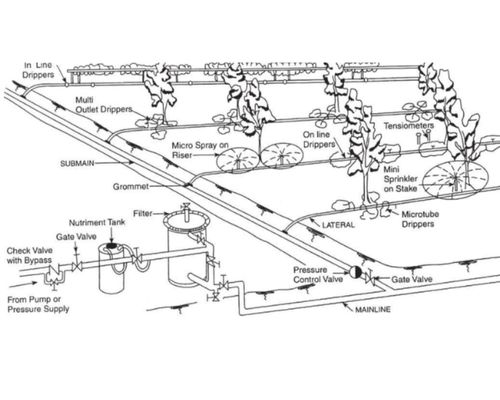
Diagram of drip irrigation system The pump unit draws water from the source and delivers it at the proper pressure into the pipe network.
The control head comprises valves regulating the pressure and discharge across the system. To clean the water, it could also have filters. The screen and graded sand filters remove fine particles suspended in water. A tank for nutrients or fertiliser is included in some control head units. During irrigation, these gradually dispense a prescribed amount of fertiliser into the water. This is only one of drip irrigation’s many benefits over other irrigation techniques.
The control head sends water to the fields via mainlines, sub-mains, and laterals. They are often composed of PVC or polyethylene hose and should be buried underground because direct sunlight quickly causes them to deteriorate. Typical lateral pipe diameters range from 13 to 32 mm.
Devices are used to regulate the water flow from the lateral to the plants, such as emitters or drippers. One or more emitters may be utilised for a single plant, such as a tree, and they have typically placed more than one metre apart.
To learn more about setting up the drip irrigation system, read this blog: Link
Sprinkler vs Drip irrigation
Sprinkler systems and drip irrigation are two of the most used methods for watering plants in agriculture. If you’re unsure of how these two systems differ from one another. You can recognise the differences using the table below.
Water is dispersed in a regulated manner by drip irrigation systems. Drip irrigation often uses a network of lengthy plastic pipes to reduce water loss due to runoff and evaporation.
On the other hand, a sprinkler system disperses water across a wider, more regulated area. When it comes to sprinklers, the pipes are underground and only the spray heads are visible above ground, unlike drip irrigation systems, which have above-ground pipes.
Drip irrigation. Sprinkler irrigation. Advantages: Advantages: A water-saving solution. Highly efficient system given its uniform water distribution. Reduced pest problems and disease. It does not need a specially trained person to operate it Uses a low-power pump. Early ripening of crop, a better yield of the crop. Good adaption, suitable to a different surface of the soil. Uniform application of fertiliser and pesticide. Disadvantages: Disadvantages: Pipe blockage Comparatively high initial cost. Needs regular maintenance. The sprinkler system requires a power pump to work. Greater chances of pest problems. The efficiency of watering will decrease with strong wind or high-temperature conditions. Sprinkler vs Drip irrigation system How can Fasal assist?
- India does not lack agricultural technology, as more entrepreneurs take on the role of Agritech innovation leadership. Through its AI-driven IoT system, Fasal has made significant progress in empowering horticulturists and giving them a chance to produce higher-quality yields.
- The Fasal system gathers current information on conditions from farm sensors to provide farmers with recommendations that are specific to their farming practices. Farmers may now accurately irrigate their crops and lessen the possibility of low harvests owing to over- or under-irrigation with the use of sensors installed in the Fasal system.
- Fasal system uses sensors and other monitoring tools to continuously monitor the microclimatic conditions on farms, allowing irrigation to be planned ahead of time and reducing the impact of unpredictable weather on farms.
- Farmers can better plan their irrigation by being informed via the Fasal system of any prospects of rain during the next 14 days.
- Using exact measurements of the soil’s moisture, the Fasal system alerts farmers when the land needs to be watered and helps them determine how much irrigation water is necessary.
Co-authored: Himani Kamboj
-
Subscribe
Subscribed
Already have a WordPress.com account? Log in now.
